A Simple Way to Set Up HTTPS with Traefik and Cloudflare
— 4 min read
ENTable of Contents
Setting up HTTPS for your applications has never been easier, thanks to tools like Traefik, Let’s Encrypt, and Cloudflare. This guide will walk you through configuring HTTPS for a simple Dockerized application, such as a service responding to /ping. By the end, you’ll have a fully functional setup complete with a docker-compose.yml file.

Let’s dive in!
Understanding HTTPS
To appreciate the importance of HTTPS, let’s briefly compare HTTP and HTTPS:
- When you enter a URL like
google.comin your browser, the browser:- Queries a DNS server to resolve the domain name (e.g.,
google.com) into an IP address (e.g.,8.8.8.8) - Sends an HTTP request to the server if you enter
http://google.comon port80 - Sends an HTTPS request if you enter
https://google.comon port443
- Queries a DNS server to resolve the domain name (e.g.,
- HTTPS uses SSL/TLS certificates to encrypt the connection between your browser and the server, ensuring security and trust.
The key takeaway is that SSL certificates encrypt the connection between the client (browser) and the server, ensuring security and trust.
Cloudflare and SSL
Cloudflare is a DNS service that enhances security and performance. It provides free SSL certificates for securing traffic between the browser and Cloudflare’s servers. However, for end-to-end encryption, you need an SSL certificate on your origin server as well.
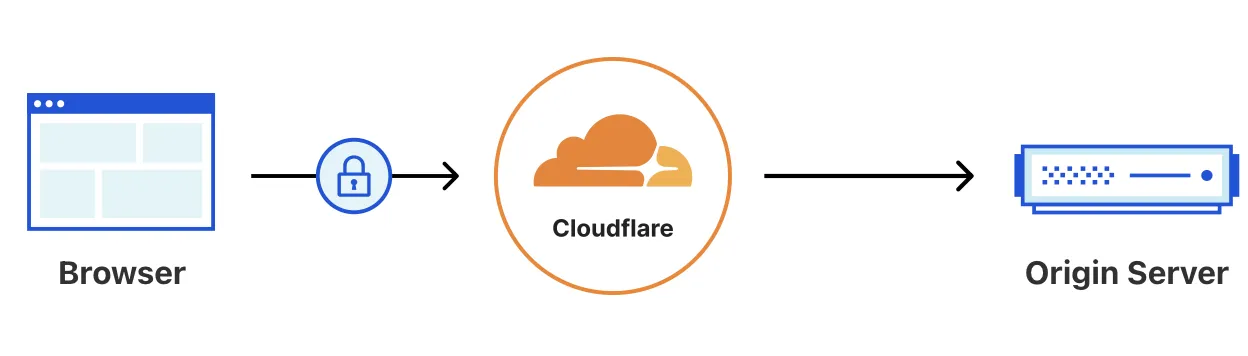
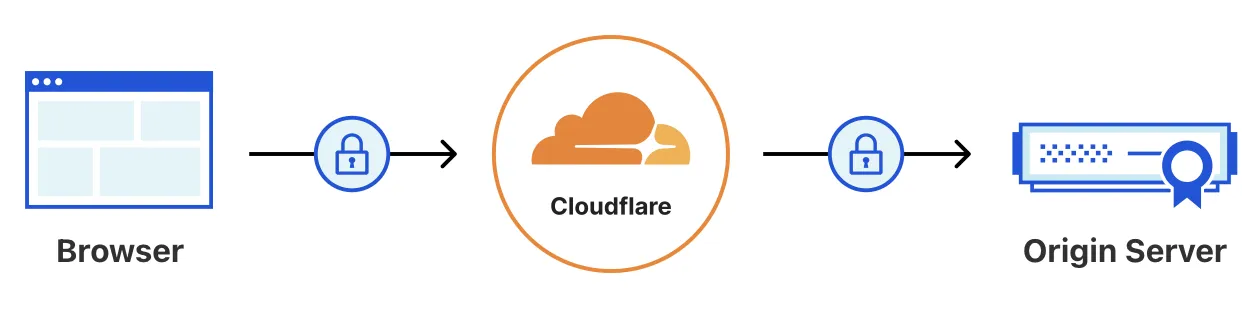
By default, the connection between Cloudflare and your origin server isn’t encrypted. To enable full encryption, set the SSL mode in Cloudflare to Full (Strict). This ensures HTTPS is used for requests to your origin server, requiring a valid SSL certificate there.
Why Use Traefik?
From official page: Traefik is an open-source Application Proxy that makes publishing your services a fun and easy experience. It receives requests on behalf of your system and identifies which components are responsible for handling them, and routes them securely. Think of it as an updated version of NGINX, tailored for modern architectures
- Simple Configuration: Automatically detects and routes Docker services
- Let’s Encrypt Integration: Automatically generates and renews SSL certificates using DNS-01 challenges
- Middleware Support: Offers features like authentication, path rewriting, and rate limiting
- Logging and Monitoring: Provides detailed logs and metrics
Prerequisites
To follow this guide, you need:
- Docker and Docker Compose installed.
- A Cloudflare API token with write access to your DNS zone. Create one by:
- Visiting the Cloudflare API Page.
- Selecting Create Token.
- Choosing the Edit zone DNS template.
- Selecting the desired domain in Zone Resources.
- Clicking Continue to Summary and then Create Token.
Save the token and email in a secure location. For example:
mkdir ./cloudflare
echo "<your-token>" > ./cloudflare/token
echo "<your-email>" > ./cloudflare/email
Alternatively, you can use environment variables:
CF_API_EMAIL=<your-email>
CF_API_TOKEN=<your-token>
Adding Traefik to Docker-Compose
Traefik integrates seamlessly with Docker using container labels. Here’s an example setup for a service that responds to /ping:
services:
  traefik:
    image: traefik:3.2.3
    container_name: traefik
    restart: always
    command:
      - --providers.docker
      - --providers.docker.exposedByDefault=false
      - --ping
      - --accesslog
      - --api.dashboard
      - --log.level=INFO
      - --entrypoints.https.address=:443
      - --certificatesresolvers.letsencrypt.acme.dnschallenge=true
      - --certificatesresolvers.letsencrypt.acme.dnschallenge.provider=cloudflare
      - --[email protected]
      - --certificatesresolvers.letsencrypt.acme.storage=/letsencrypt/acme.json
    environment:
      - CF_API_EMAIL_FILE=/cloudflare/email
      - CF_DNS_API_TOKEN_FILE=/cloudflare/token
    ports:
      - target: 443
        published: 443
        protocol: tcp
        mode: host
    volumes:
      - /var/run/docker.sock:/var/run/docker.sock:ro
      - ./letsencrypt:/letsencrypt
      - ./cloudflare:/cloudflare
    logging:
      driver: "json-file"
      options:
        max-size: "10m"
        max-file: "3"
    healthcheck:
      test: traefik healthcheck --ping
      retries: 3
      interval: 10s
      timeout: 10s
      start_period: 30s

  ping:
    image: exelban/ping
    container_name: ping
    restart: always
    labels:
      - traefik.enable=true
      - traefik.http.routers.ping.rule=Host(`api.example.com`) && PathPrefix(`/ping`)
      - traefik.http.routers.ping.entrypoints=https
      - traefik.http.routers.ping.tls=true
      - traefik.http.routers.ping.tls.certresolver=letsencrypt
      - traefik.http.services.ping.loadbalancer.server.port=8080
Container Labels Explained
traefik.enable=true: Enables the service in Traefik.traefik.http.routers.ping.rule=Host(api.example.com) && PathPrefix(/ping): Routes traffic forapi.example.com/pingto this service.traefik.http.routers.ping.entrypoints=https: Specifies the HTTPS entry point.traefik.http.routers.ping.tls=true: Enables TLS for this service.traefik.http.routers.ping.tls.certresolver=letsencrypt: Uses Let’s Encrypt to resolve the SSL certificate.traefik.http.services.ping.loadbalancer.server.port=8080: Maps the service’s internal port.
Please note that all labels have ping in name. It’s a pointer for each service. So if you want to add additional service auth for example, do not forget to change that name in the auth service labels.
Adding Middleware Example
Traefik supports middleware, such as stripping prefixes from request paths. Here’s an example:
labels:
  - "traefik.http.middlewares.auth-strip.stripprefix.prefixes=/auth"
  - "traefik.http.routers.auth.middlewares=auth-strip"
This middleware transforms requests from /auth/token to /token.
Conclusion
By combining Traefik, Docker, and Cloudflare, you can create a streamlined and secure setup for HTTPS-enabled services. This approach not only simplifies certificate management but also ensures your applications are secure and scalable.
Happy coding!